Introduction to Difficult Yoga Poses
Advanced yoga poses are the ultimate strength, flexibility, and balance test. These challenging poses, like the handstand and scorpion pose, require both physical ability and mental focus. Mastering these difficult asanas can take your yoga journey to the next level, helping you achieve greater mindfulness and body awareness.
To safely work towards these advanced yoga positions, following a structured plan that includes proper warm-up exercises, consistent practice, and guidance from an experienced yoga instructor is essential. Being part of the yoga community can provide extra support and motivation, helping you stay dedicated to your practice.
Preparation is crucial when attempting hard yoga poses. Incorporate tips such as gradually building your core strength and increasing your flexibility through specific exercises. This approach helps reduce the risk of injury and ensures a safer, more enjoyable experience as you push the boundaries of your abilities.
Understanding yoga anatomy and yoga philosophy can significantly enhance your practice, helping you approach advanced poses with greater awareness and mindfulness.
Handstand (Adho Mukha Vrksasana)
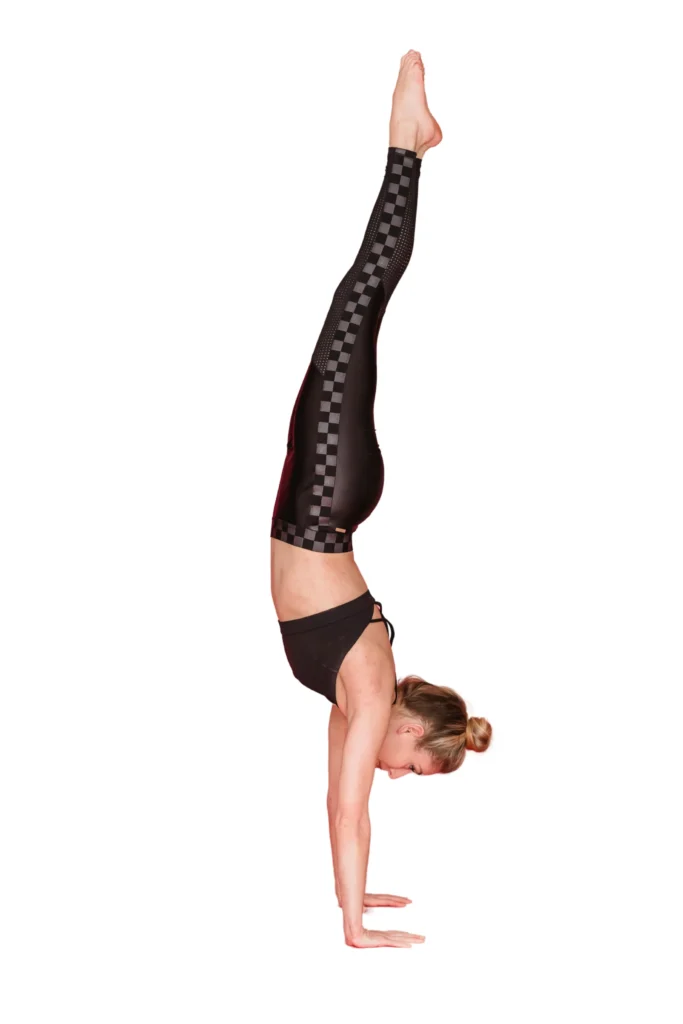
Handstand (Adho Mukha Vrksasana) is among the most impressive and challenging yoga poses. It requires a combination of core strength, upper body strength, and balance. Here’s a detailed guide to help you master this inverted pose.
How to Do a Handstand
- Warm-Up: Start with a good warm-up to prepare your body. Focus on poses like forearm plank and dolphin pose to build the necessary strength and flexibility.
- Find a Wall: Begin by practicing against a wall for support. This helps you get used to being upside down without the risk of falling.
- Starting Position: Begin in a downward-facing dog pose. Walk your feet closer to your hands to shorten the distance between them.
- Lift Off: Shift your weight onto your hands and kick one leg up, followed by the other. If needed, use the wall to catch your feet.
- Balance and Hold: Engage your core and keep your body straight. Try to balance without relying too much on the wall.
- Come Down Safely: When you’re ready to come down, gently lower one leg at a time back to the ground.
Training Exercises for Handstand
To build the strength needed for a handstand, practice these exercises regularly:
- Forearm Plank: Hold a forearm plank for 30-60 seconds to strengthen your core and shoulders.
- Dolphin Pose: This pose helps improve shoulder flexibility and strength, which are crucial for handstands.
- Wall-Supported Handstand: Kick up into a handstand against the wall and hold for as long as possible to get comfortable with the position.
Mastering the yoga handstand takes time and patience. Keep practicing and gradually increase the duration of your handstand holds. With dedication, you’ll find yourself balancing confidently in no time.
Crow Pose (Bakasana)
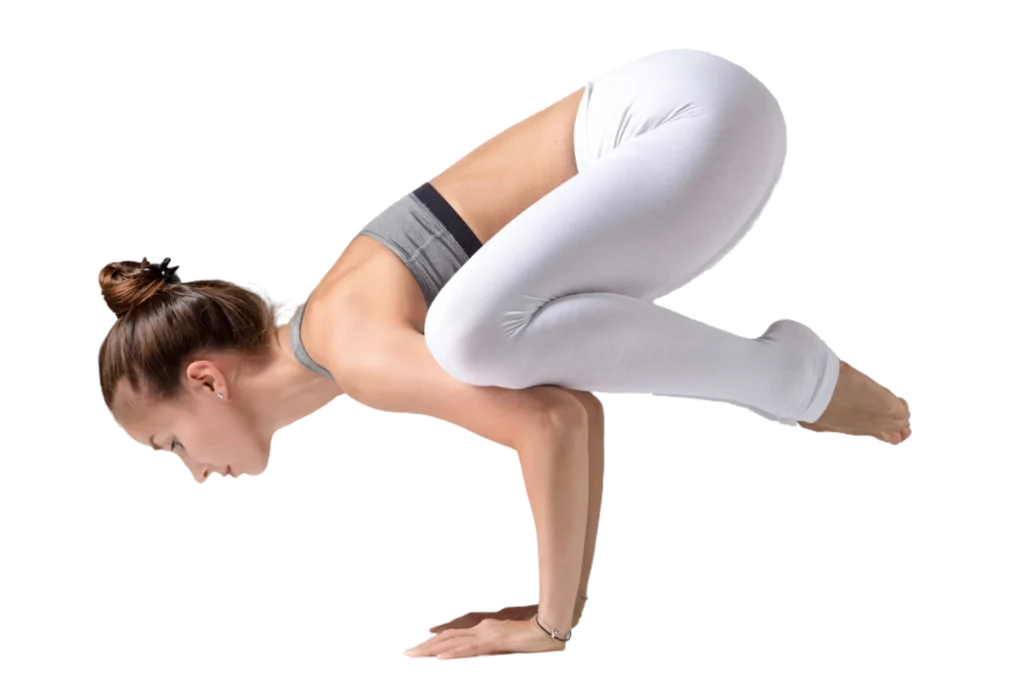
Crow Pose (Bakasana) is a fundamental arm balance that helps develop core strength and improve overall balance. Here’s a step-by-step guide to help you master this pose, along with its benefits and preparatory exercises.
How to Do Crow Pose
- Starting Position: Begin in a squat with your feet close together and your knees wide apart. Place your hands flat, shoulder-width apart, and spread your fingers for better grip.
- Positioning the Knees: Bend your elbows slightly and lift your hips. Place your knees on the backs of your upper arms, as close to your armpits as possible.
- Engage the Core: Lean forward slowly, shifting your weight onto your hands. Engage your core muscles to help lift your feet off the ground.
- Lift Off: Start by lifting one foot off the ground, then the other. Balance on your hands, keeping your gaze forward to help maintain balance.
- Hold the Pose: Hold the pose for a few breaths once both feet are off the ground. Keep your core engaged and try to maintain a steady balance.
- Come Down Safely: To come out of the pose, gently lower your feet back and return to a squat position.
Benefits of Crow Pose
- Strengthens Arms and Wrists: Crow Pose helps build strength in your arms and wrists, which is essential for other advanced arm balances.
- Improves Core Strength: This pose engages your core muscles, helping to improve overall core stability and strength.
- Enhances Balance and Focus: Balancing on your hands requires concentration and focus, which can enhance your overall balance and mental clarity.
Preparatory Poses for Crow Pose
To prepare for Bakasana, incorporate these exercises into your practice:
- Plank Pose: Hold plank pose to build arm and core strength.
- Chaturanga Dandasana: Practice this pose to strengthen your arms and shoulders.
- Low Boat Pose: Engage your core with low boat pose, which helps develop the strength needed for Crow Pose.
Mastering Crow Pose requires practice and patience. By building your arm balance and core strength through these preparatory exercises, you can confidently lift into Bakasana and enjoy its many benefits.
Scorpion Pose (Vrschikasana/Vrischikasana)
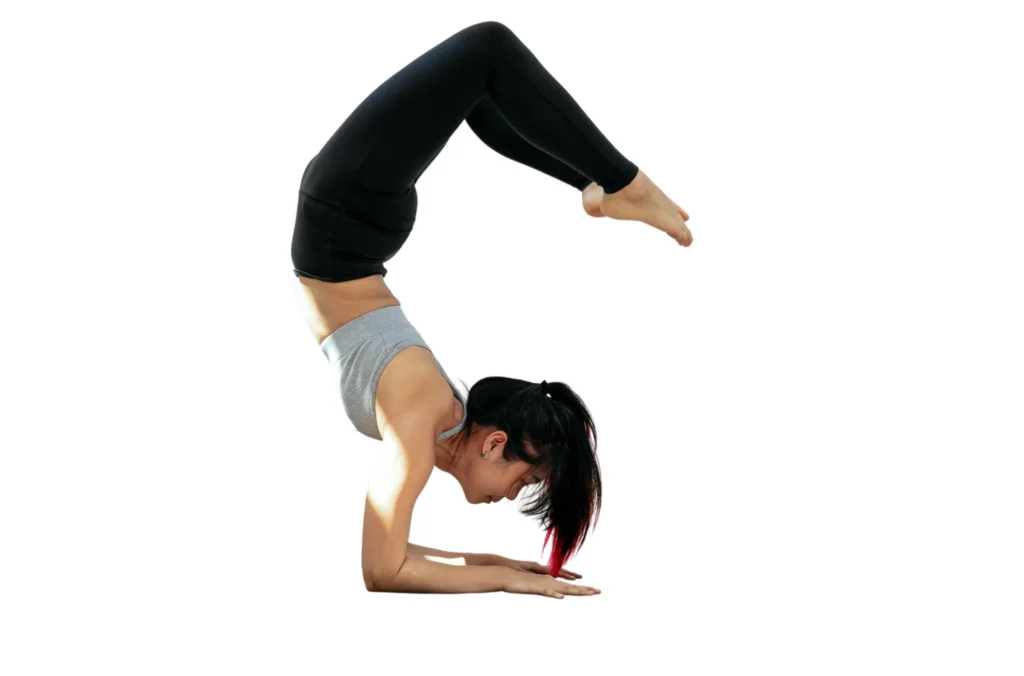
Scorpion Pose (Vrschikasana) is an advanced backbend that requires significant spine and shoulder flexibility. It combines balance, strength, and flexibility, making it a challenging yet rewarding pose to master. Here’s a comprehensive guide to help you achieve this impressive pose.
How to Do Scorpion Pose
- Starting Position: Begin in a forearm stand. Place your forearms on the ground, shoulder-width apart, and lift your hips. Kick up into a forearm balance, keeping your body straight.
- Engage Your Core: Maintain a strong core to stabilize your body as you prepare to move into the backbend.
- Bend Your Knees: Slowly bend your knees and start to arch your back. Bring your feet towards your head, aiming to touch them to the top of your head or as close as possible.
- Open Your Shoulders: As you deepen the backbend, allow your shoulders to open up. Keep your gaze forward to help with balance.
- Hold the Pose: Once you are in the full scorpion pose, hold it for a few breaths. Focus on maintaining balance and control.
- Come Down Safely: To come out of the pose, slowly straighten your legs and bring them back to the starting forearm stand position before gently lowering them to the ground.
Benefits of Scorpion Pose
- Increases Spine Flexibility: Scorpion pose is an excellent way to improve flexibility in your spine.
- Strengthens Shoulders and Arms: Holding the pose requires significant strength in your shoulders and arms.
- Enhances Balance and Focus: Balancing in this deep backbend improves your overall balance and concentration.
Preparatory Poses for Scorpion Pose
To prepare for Vrschikasana, incorporate these exercises into your practice:
- Camel Pose: This pose helps open the shoulders and stretch the spine, preparing you for the deep backbend in scorpion pose.
- Wheel Pose: Practicing wheel pose can increase flexibility in your spine and shoulders, making it easier to transition into scorpion pose.
- Forearm Stand: Building strength and balance in a forearm stand is crucial before attempting scorpion pose. Practice holding this position to develop the necessary stability.
Mastering the scorpion yoga pose requires patience and consistent practice. By focusing on spine and shoulder flexibility and using these preparatory exercises, you can gradually work towards achieving this stunning advanced backbend.
Eight-Angle Pose (Astavakrasana/Ashtavakrasana)
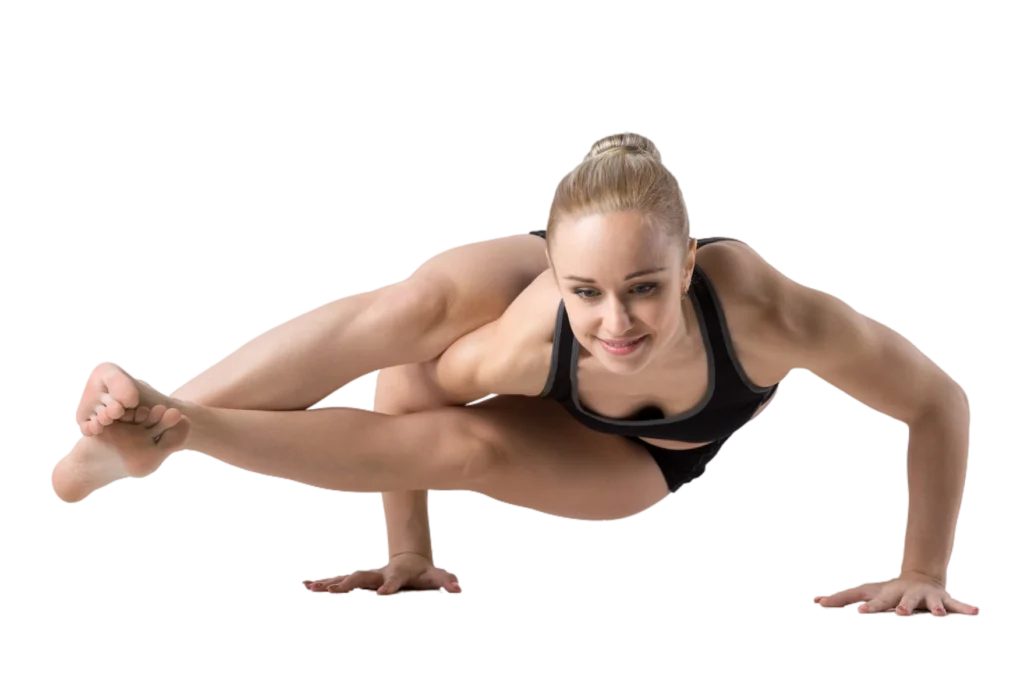
Eight-Angle Pose (Astavakrasana) is a challenging arm balance that requires core strength and hip flexibility. This pose builds physical strength and enhances mental focus and balance. Here’s how to master this impressive pose.
How to Do Eight-Angle Pose
- Starting Position: Sit with your legs extended in front of you. Bend your right knee and bring your right foot to the outside of your left hip.
- Hook the Knee: Slide your right arm under your right knee and hook your knee over your right shoulder. Place your hands on the floor beside your hips, fingers pointing forward.
- Lift Off: Press your hands into the ground, lift your hips, and swing your left leg over your right foot. Cross your ankles for stability.
- Bend the Elbows: Bend your elbows to a 90-degree angle and lean forward. Keep your chest lifted and gaze forward.
- Extend the Legs: Straighten your legs out to the side, keeping your core engaged and your hips lifted. Hold the pose for a few breaths.
- Come Down Safely: To come out of the pose, gently lower your hips back to the ground and release your legs.
Benefits of Eight-Angle Pose
- Strengthens Core: This pose engages and strengthens the abdominal muscles, helping to improve core stability.
- Enhances Arm and Shoulder Strength: Supporting your body weight on your arms builds significant strength in your arms and shoulders.
- Improves Balance and Focus: Balancing in this pose requires concentration and mental focus, which can enhance overall balance and mindfulness.
Preparatory Poses for Eight-Angle Pose
To prepare for Astavakrasana, incorporate these exercises into your practice:
- Boat Pose: Strengthen your core by holding boat pose for 30-60 seconds.
- Firefly Pose: Practice firefly pose to improve arm strength and balance.
- Lizard Pose: Lizard pose increases hip flexibility, helping you get your leg over your shoulder in eight-angle pose.
Mastering Eight-Angle Pose requires dedication and consistent practice. By building core strength and improving hip flexibility through these preparatory exercises, you can confidently achieve this challenging yoga arm balance and enjoy its numerous benefits.
King Pigeon Pose (Kapotasana)
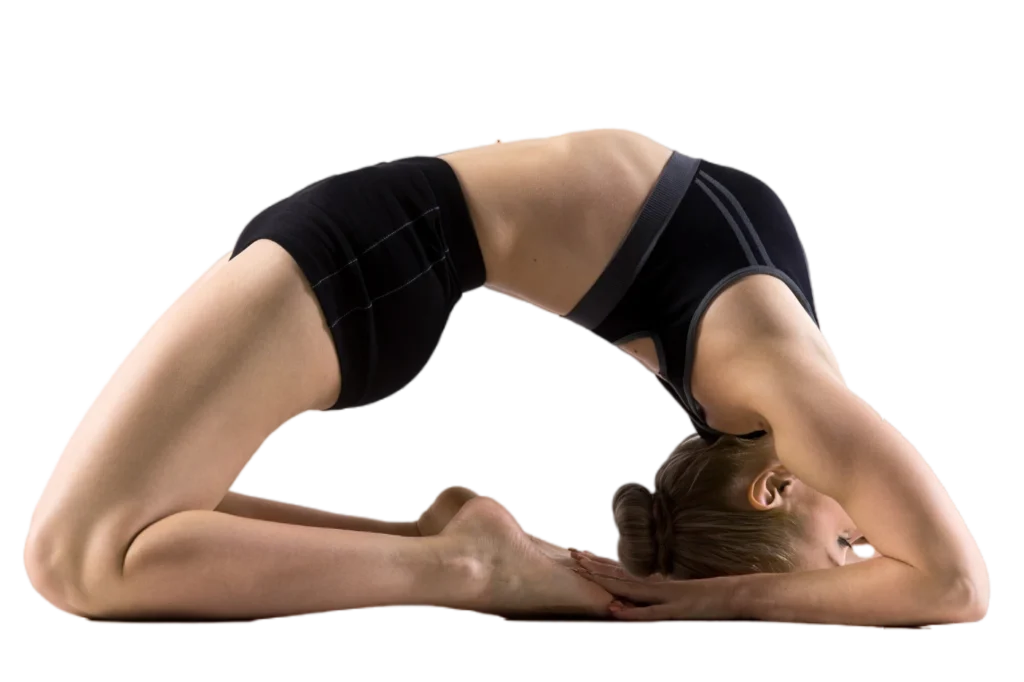
King Pigeon Pose (Kapotasana) is a deep backbend and hip opener that enhances spine and hip flexibility. This advanced pose requires significant preparation and practice. Here’s a guide to help you master Kapotasana.
How to Do King Pigeon Pose
- Starting Position: Begin in a high kneeling position with your knees hip-width apart and your thighs perpendicular to the floor.
- Engage the Core: Engage your core to support your lower back and ensure stability.
- Backbend: Slowly start to lean back, bringing your hands to your heels. Keep your chest lifted and your gaze up.
- Deepen the Pose: Once you’re comfortable, lower your head back and, if possible, place the crown of your head on the soles of your feet. Hold your ankles for support.
- Hold the Pose: Stay in the pose for a few breaths, focusing on opening your chest and deepening the backbend.
- Come Up Safely: To come out of the pose, slowly lift your head and chest, returning to the starting position.
Benefits of King Pigeon Pose
- Increases Spine Flexibility: Kapotasana stretches and opens the spine, promoting greater flexibility.
- Enhances Hip Flexibility: This pose deeply stretches the hip flexors and quadriceps.
- Opens the Chest: King Pigeon Pose helps to open the chest and improve posture.
Preparatory Poses for King Pigeon Pose
To prepare for Kapotasana, incorporate these exercises into your practice:
- Pigeon Pose: Practice pigeon pose to increase hip flexibility and open the hip flexors.
- Lizard Pose: This pose helps to stretch and open the hips, preparing you for the deep stretch in King Pigeon Pose.
- Low Lunge with Quad Stretch: Engage in low lunge with a quad stretch to lengthen the hip flexors and quadriceps.
Mastering King Pigeon Pose requires dedication and proper preparation. By focusing on hip and spine flexibility through these preparatory exercises, you can safely and effectively achieve this deep backbend and enjoy its numerous benefits.
Headstand Pose (Sirsasana)
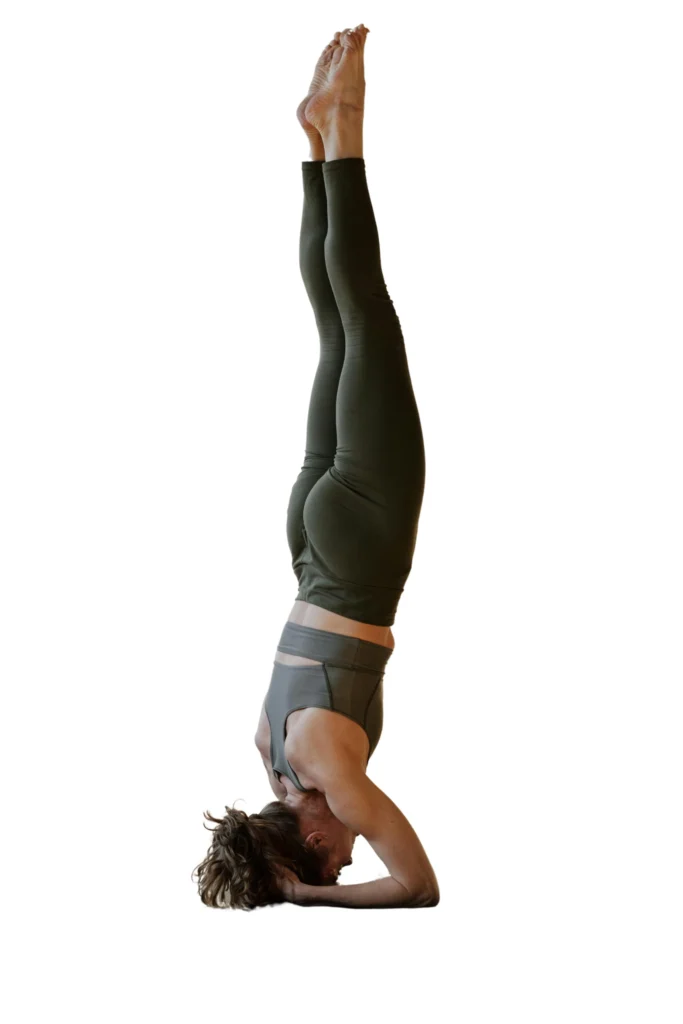
Headstand Pose (Sirsasana) is a foundational inversion in yoga that promotes balance and mental clarity. Here’s a step-by-step guide to help you master this pose, along with its benefits and preparation tips.
How to Do Headstand Pose
- Starting Position: Begin in a dolphin pose with your forearms on the ground and your elbows shoulder-width apart. Interlace your fingers to create a stable base for your head.
- Place Your Head: Gently place the crown of your head on the ground, cradling the back of your head with your interlaced fingers.
- Walk Your Feet Closer: Slowly walk your feet towards your head, keeping your legs straight. This will help shift your weight onto your forearms and head.
- Lift Your Legs: Gradually lift one leg at a time off the ground, bringing your knees towards your chest. Once you feel stable, extend your legs straight up towards the ceiling.
- Hold the Pose: Engage your core and keep your body straight. Hold the pose for several breaths, focusing on balance and stability.
- Come Down Safely: To come out of the pose, slowly bend your knees and bring your feet back to the ground, returning to dolphin pose.
Benefits of Headstand Pose
- Improves Balance: Practicing headstand enhances your sense of balance and stability.
- Boosts Circulation: Inversion poses like Sirsasana promote blood flow to the brain, improving concentration and mental clarity.
- Strengthens Upper Body: Holding a headstand builds strength in your shoulders, arms, and core muscles.
Preparatory Poses for Headstand
To prepare for Sirsasana, incorporate these exercises into your practice:
- Dolphin Pose: Strengthens the shoulders and prepares you for the weight-bearing aspect of headstand.
- Tripod Headstand: Practice this variation to build confidence and balance before attempting the full headstand.
- Plank Pose: Develops core strength, which is essential for maintaining stability in headstand.
Mastering the yoga headstand takes time and consistent practice. By focusing on these preparatory exercises and prioritizing neck safety, you can safely achieve and enjoy the numerous benefits of this classic inversion pose.
Firefly Pose (Tittibhasana)
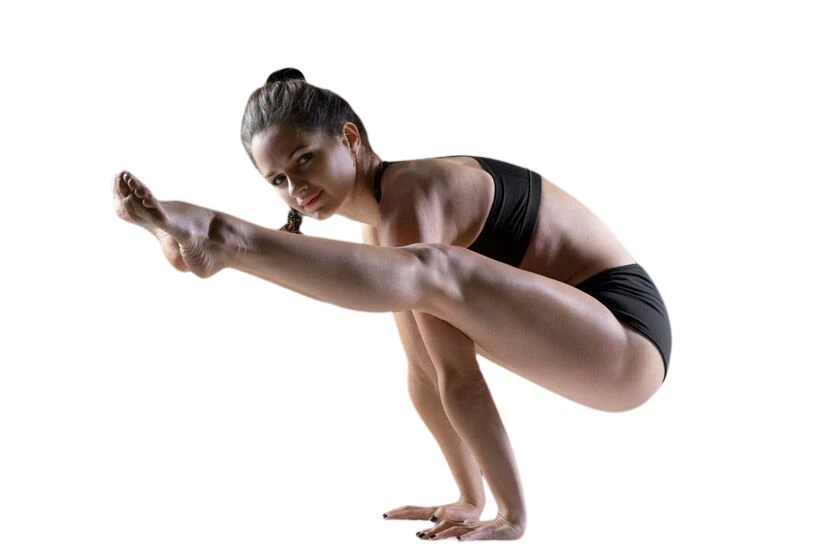
Firefly Pose (Tittibhasana) is an advanced arm balance pose that requires significant abdominal and wrist strength. This pose enhances flexibility and builds upper body strength. Here’s a guide and preparatory exercises to help you master Firefly Pose.
How to Do Firefly Pose
- Starting Position: Begin in a standing position with your feet hip-width apart. Bend forward and place your hands on the ground, shoulder-width apart.
- Position the Legs: Bend your knees and lift your hips. Slide your arms under your legs, bringing your thighs as high as possible on your upper arms.
- Lift the Feet: Shift your weight onto your hands and lift your feet off the ground. Straighten your legs out to the sides, keeping them parallel to the floor.
- Engage the Core: Engage your abdominal muscles to help lift and stabilize your body. Keep your gaze forward.
- Hold the Pose: Maintain the position briefly, focusing on balance and control.
- Come Down Safely: To come out of the pose, slowly lower your feet back and release your arms.
Benefits of Firefly Pose
- Strengthens Abdominal Muscles: Firefly pose requires strong core muscles to lift and hold your body.
- Builds Wrist and Arm Strength: Supporting your body weight on your hands enhances wrist and arm strength.
- Improves Flexibility: This pose stretches the hamstrings and opens the hips, improving overall flexibility.
Preparatory Poses for Firefly Pose
To prepare for Tittibhasana, incorporate these exercises into your practice:
- Plank Pose: Build core and wrist strength by holding plank pose for 30-60 seconds.
- Crow Pose: Practice crow pose to develop arm balance and strength, which are essential for firefly pose.
- Warrior III: Enhance your balance and engage your core with warrior III pose.
Mastering Firefly Pose requires patience and consistent practice. Through these preparatory exercises, you can focus on abdominal and wrist strength to achieve this impressive arm balance and enjoy its many benefits.
The Wheel Pose (Urdhva Dhanurasana)
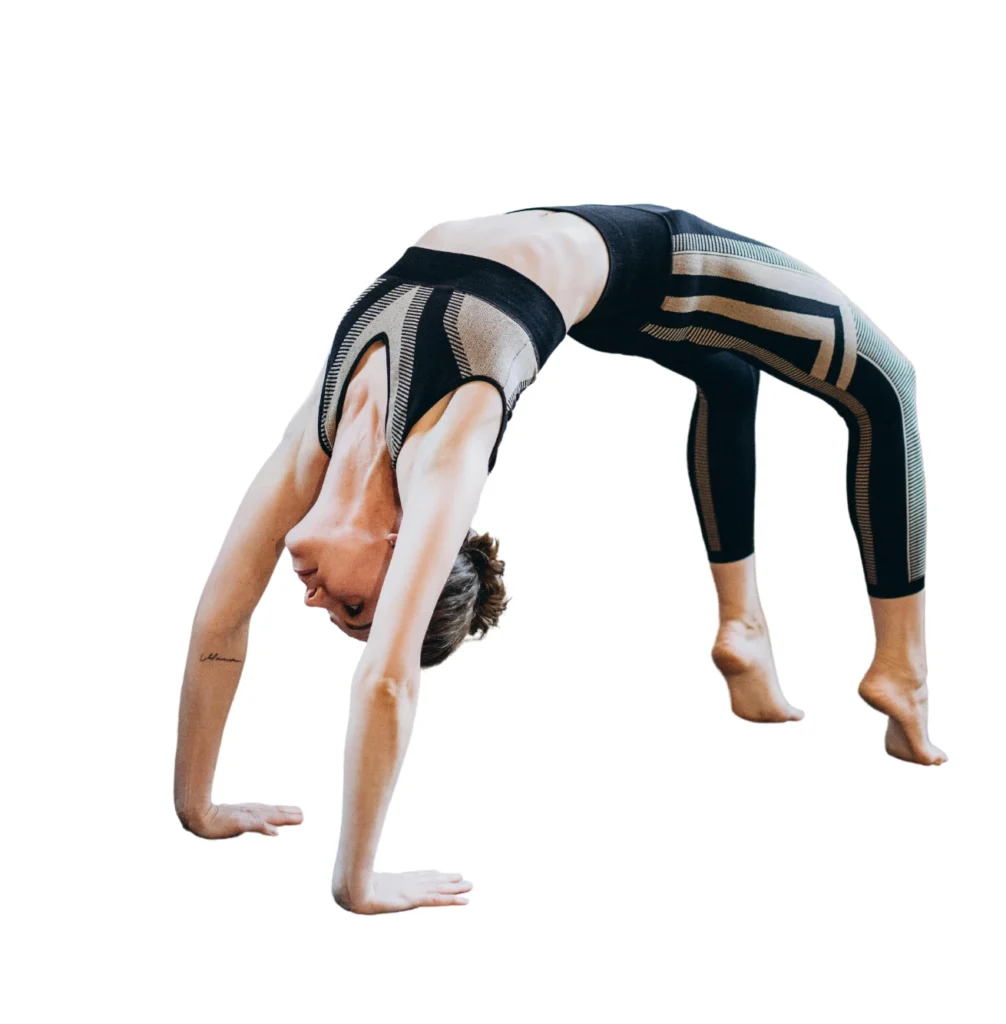
The Wheel Pose (Urdhva Dhanurasana) is a powerful backbend that enhances back flexibility and strengthens the entire body. This pose, also known as the upward bow pose, deeply opens the chest and shoulders. Here’s a guide to help you perform The Wheel Pose, along with its benefits and preparatory exercises.
How to Do The Wheel Pose
- Starting Position: Lie on your back with your knees bent and your feet flat on the floor, hip-width apart. Place your hands on the ground beside your ears, fingers pointing towards your shoulders.
- Engage the Core: Engage your core muscles and press your feet and hands into the floor.
- Lift Your Body: On an inhale, lift your hips, chest, and head off the ground, coming into a bridge pose first.
- Straighten the Arms: Press into your hands and feet, straighten your arms, and lift your head off the ground. Your body should form an arch, with your chest facing the ceiling.
- Hold the Pose: Hold the pose for a few breaths, keeping your core engaged and your gaze towards the floor or the ceiling.
- Come Down Safely: To come out of the pose, slowly lower your head, shoulders, and hips back to the ground, releasing your arms last.
Benefits of The Wheel Pose
- Improves Back Flexibility: This deep backbend stretches the spine, improving overall back flexibility.
- Opens the Chest and Shoulders: The Wheel Pose provides a deep stretch for the chest and shoulders, enhancing respiratory function and posture.
- Strengthens the Entire Body: Engaging the arms, legs, and core muscles builds strength throughout the body.
Preparatory Poses for The Wheel Pose
To prepare for Urdhva Dhanurasana, incorporate these exercises into your practice:
- Cobra Pose: Practice cobra pose to gently stretch and strengthen the back muscles, preparing for deeper backbends.
- Upward Facing Dog: This pose helps to open the chest and build strength in the arms and back.
- Bridge Pose: Bridge pose is a foundational backbend that helps build the flexibility and strength needed for The Wheel Pose.
Mastering The Wheel Pose requires consistent practice and proper preparation. These preparatory exercises focus on back flexibility and chest opening, allowing you to safely achieve and enjoy the benefits of this powerful backbend yoga pose.
Flying Crow Pose (Eka Pada Galavasana)
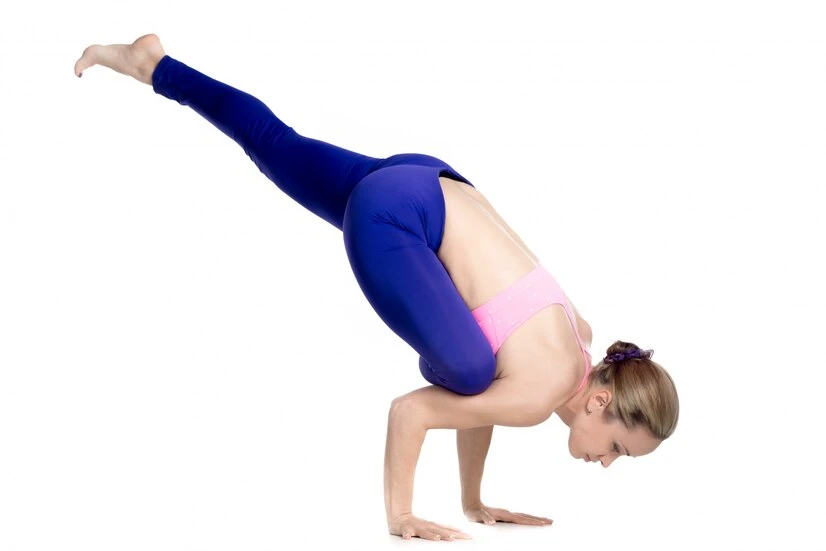
Flying Crow Pose (Eka Pada Galavasana) is an advanced arm balance pose that requires significant wrist strength and balance. This pose combines arm balancing and hip-opening elements, making it a challenging and rewarding addition to your practice. Here’s a detailed guide to mastering Flying Crow Pose, its benefits, and preparatory exercises.
How to Do Flying Crow Pose
- Starting Position: Begin in chair pose with your feet together and knees bent. Bring your palms together at your chest.
- Cross the Ankle: Lift your right foot and place your right ankle over your left thigh, just above the knee, in a figure-four position.
- Forward Fold: Lean forward, bringing your hands to the ground before you. Place your palms shoulder-width apart.
- Hook the Foot: Hook your right foot around your upper left arm, just above the elbow.
- Lift the Leg: Shift your weight forward onto your hands and bend your elbows. Lift your left foot off the ground, straightening your left leg behind you.
- Balance and Hold: Engage your core and focus on balancing. Hold the pose for a few breaths.
- Come Down Safely: To come out of the pose, slowly lower your left foot back to the ground, release your right foot, and return to chair pose.
Benefits of Flying Crow Pose
- Builds Wrist and Arm Strength: Supporting your body weight on your hands strengthens the wrists and arms.
- Enhances Balance and Focus: This pose requires concentration and balance, improving overall mental focus.
- Opens the Hips: The position of the legs provides a deep hip stretch, enhancing hip flexibility.
Preparatory Poses for Flying Crow Pose
To prepare for Eka Pada Galavasana, incorporate these exercises into your practice:
- Chair Pose: Build strength in your legs and improve balance with chair pose.
- Crow Pose: Practice crow pose to develop arm balance and wrist strength, essential for flying crow pose.
- Pigeon Pose: Increase hip flexibility and prepare for the leg position in flying crow pose with pigeon pose.
Mastering Flying Crow Pose requires patience and dedication. By focusing on wrist strength and balance through these preparatory exercises, you can confidently achieve this advanced arm balance and enjoy its many benefits.
Forearm Balance (Pincha Mayurasana)
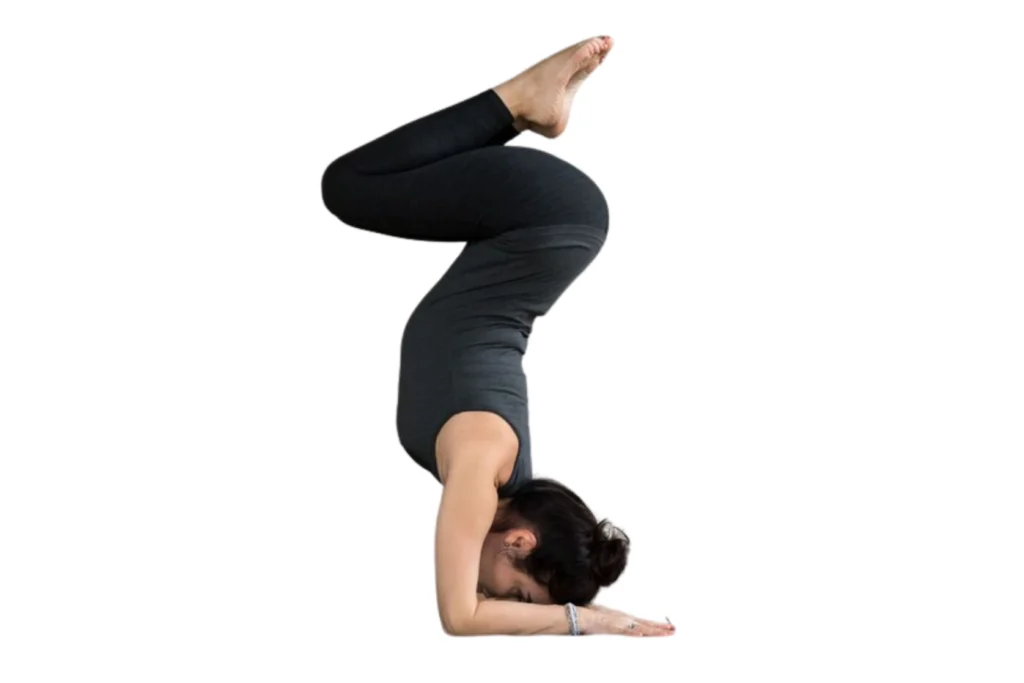
Forearm Balance (Pincha Mayurasana) is a challenging inversion emphasizing shoulder strength and balance. This pose requires a strong upper body and core, making it an impressive and beneficial addition to your yoga practice. Here’s a detailed guide to mastering Forearm Balance, along with its benefits and preparatory exercises.
How to Do Forearm Balance
- Starting Position: Begin in dolphin pose with your forearms on the ground and your elbows shoulder-width apart. Your hands should be flat on the floor, fingers spread wide.
- Engage the Core: Engage your core muscles to stabilize your body and protect your lower back.
- Lift the Hips: Walk your feet closer to your elbows, lifting your hips towards the ceiling. This position helps you shift your weight onto your forearms.
- Kick Up: Slowly lift one leg up towards the ceiling, followed by the other leg. Alternatively, you can kick up with both legs simultaneously.
- Find Balance: Once both legs are up, engage your core and shoulders to maintain balance. Keep your body straight and avoid arching your back.
- Hold the Pose: Hold the pose for several breaths, focusing on balance and stability.
- Come Down Safely: To come out of the pose, slowly lower one leg at a time back to the ground, returning to dolphin pose.
Benefits of Forearm Balance
- Strengthens Shoulders and Arms: Pincha Mayurasana builds significant strength in the shoulders and arms.
- Enhances Balance and Focus: This inversion improves overall balance and concentration.
- Engages Core Muscles: Maintaining the pose requires a strong and engaged core, enhancing core stability.
Preparatory Poses for Forearm Balance
To prepare for Pincha Mayurasana, incorporate these exercises into your practice:
- Plank Pose: Build core and shoulder strength with plank pose, essential for stability in forearm balance.
- Dolphin Pose: Practice dolphin pose to strengthen your shoulders and get used to the forearm position.
- Candle Pose: This pose helps develop balance and stability, preparing you for inversions like forearm balance.
Mastering Forearm Balance requires dedication and consistent practice. By focusing on shoulder strength and balance through these preparatory exercises, you can safely achieve and enjoy the benefits of this powerful forearm stand yoga pose.
Benefits of Practicing Difficult Yoga Poses
Mastering difficult yoga poses offers numerous physical and mental health benefits. These challenging asanas can significantly enhance your overall well-being, contributing to both strength and mindfulness. Here’s a closer look at the key benefits of incorporating hard yoga poses into your practice.
Physical Benefits
- Increased Muscle Strength: Difficult yoga poses, such as arm balances and inversions, build strength in your core, arms, shoulders, and legs. This muscle development improves overall physical performance and endurance.
- Improved Flexibility: Advanced poses often require a greater range of motion, helping to stretch and lengthen muscles. Enhanced flexibility can lead to better posture and reduced risk of injuries.
- Enhanced Balance and Coordination: Mastering challenging poses like headstands and forearm balances improves your sense of balance and body awareness, which can benefit daily activities and other physical pursuits.
- Cardiovascular Health: Some difficult yoga poses engage large muscle groups and increase heart rate, contributing to better cardiovascular health.
Mental Benefits
- Stress Relief: Practicing difficult poses requires deep focus and controlled breathing, which can reduce stress levels and promote relaxation.
- Improved Concentration and Mental Clarity: Balancing and holding challenging poses enhances concentration and mental clarity. The discipline required for these poses translates into better focus in other areas of life.
- Boosted Confidence and Discipline: Successfully mastering difficult poses fosters a sense of accomplishment and boosts self-confidence. The discipline developed through regular practice helps cultivate patience and perseverance.
- Mindfulness and Presence: Engaging in advanced yoga poses encourages mindfulness, as you must stay present and attentive to your body’s alignment and breath. This mindfulness can extend beyond the mat, promoting a more centered and aware lifestyle.
Yoga for Overall Well-Being
Incorporating hard yoga poses into your practice improves physical health and enhances mental clarity and emotional balance. Combining strength, flexibility, and mindfulness fosters a holistic approach to well-being, making yoga a powerful tool for a healthy and balanced life.
By consistently practicing and challenging yourself with difficult poses, you can experience the profound benefits of yoga, both physically and mentally. Practicing pranayama alongside difficult yoga poses can enhance your breath control and mental clarity.
Safety Tips and Precautions
Practicing difficult yoga poses can be highly rewarding, but it’s essential to prioritize safety to prevent injuries and ensure a positive experience. Here are key safety tips and precautions to keep in mind:
Warm-Up Properly
- Start with a Warm-Up: Always begin your practice with a thorough warm-up. Incorporate dynamic stretches and gentle movements to prepare your muscles and joints for more intense poses.
- Focus on Flexibility and Mobility: Include exercises that enhance flexibility and joint mobility to reduce the risk of strains and sprains.
Seek Guidance from a Qualified Instructor
- Learn from a Certified Instructor: Working with a qualified yoga instructor ensures that you learn proper techniques and receive personalized guidance. They can help you understand the nuances of each pose and provide adjustments as needed.
- Ask for Modifications: If a pose feels too challenging, ask your instructor for modifications. Using props like blocks, straps, or bolsters can make difficult poses more accessible and safer.
Practice Proper Alignment and Breath Control
- Maintain Proper Alignment: Focus on correct alignment to prevent injuries and ensure you get the full benefit of each pose. Misalignment can lead to unnecessary strain on muscles and joints.
- Control Your Breath: Use breath control to support your movements and maintain stability. Deep, steady breathing helps you stay focused and calm, especially in challenging poses.
Progress Gradually
- Gradual Progression: Avoid rushing into advanced poses. Through consistent practice, gradually build your strength, flexibility, and balance. Trying to achieve difficult poses too quickly can lead to injuries.
- Listen to Your Body: Pay attention to your body’s signals. If you experience pain or discomfort, leave the pose and rest. Pushing through pain can cause serious injuries.
Use Yoga Modifications and Props
- Modify When Needed: Modify poses to make them more accessible. For example, if you’re working on a handstand, practice against a wall for support until you build enough strength and confidence.
- Incorporate Props: Props such as blocks, straps, and bolsters can provide additional support and stability, helping you achieve proper alignment and reduce the risk of injury.
Regularly Consult with a Yoga Instructor
- Regular Check-Ins: Consult with your yoga instructor regularly to assess your progress and receive feedback. They can help you refine your practice and ensure you are on the right track.
- Stay Updated: Stay informed about safe practices and new techniques. Continuous learning and adaptation are key to a safe and effective yoga practice.
By following these yoga safety tips and taking the necessary precautions, you can enjoy a safe yoga practice while progressing with advanced yoga poses. Remember that patience, consistency, and mindfulness are essential for avoiding injuries and achieving long-term success in yoga.
Learning through yoga teacher training ensures you practice advanced poses safely and effectively, with proper guidance and support. For an exceptional experience, consider Joga Yoga’s Teacher Training in Canggu, Bali, which combines expert instruction, a comprehensive curriculum, and a stunning location for a transformative journey. You can find out more about the classes here.
FAQ
Can beginners practice advanced yoga poses?
No, they should not without proper preparation and guidance. Start with foundational poses to build strength and flexibility, and gradually work towards more difficult poses under the supervision of a qualified instructor.
How often should I practice yoga to see benefits?
Practicing yoga 2-3 times a week can improve flexibility, strength, and mental well-being. Consistency is key, and even short daily sessions can be beneficial.
What should I do if I feel pain during a yoga pose?
If you feel pain during a yoga pose, stop immediately and assess the cause. Modify the pose or use props to reduce strain. Consult with a yoga instructor to ensure proper alignment and technique. Avoid pushing through pain to prevent injury.
Can yoga help with back pain?
Yes, yoga can help alleviate back pain by improving flexibility, strengthening core muscles, and promoting better posture. Poses like child’s pose, cat-cow, and gentle twists can be particularly beneficial.
How long does it take to see progress in yoga?
Progress in yoga varies by individual, but you may start to see improvements in flexibility, strength, and mental clarity within a few weeks of consistent practice. Regular practice and patience are key to long-term benefits.
